WNRP 350 Capture the Flag
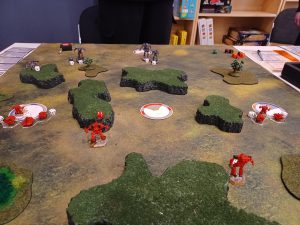
My second battle of the day was Capture the Flag against an opponent that vastly outgunned me but could not hope to match the speed of my five fielded hovercraft, pair of BattleArmor squads, and my fast BattleMechs. My trusty J. Edgars picked up the two outer flags on turn one without opposition.
Turn two saw them returning the flags for points while my BattleMechs and Plainsman moved to take the center flag. My Blizzards and Marauder BattleArmors swept behind the enemy line and I focused all firepower on the enemy Atlas until I took it down. I lost one of my BattleArmor squads and my Shadow Hawk IIC in that fight, but my Plainsman quickly picked up the flag.
My J. Edgars moved back out to take the right flag on turn three, supported by my Uziel, Blizzards, and surviving BattleArmor. The enemy focused fire on the J. Edgars, killing the crew on one, and crippling the other, so my Uziel picked up the flag. The enemy Spider meanwhile picked up the left flag without any opposition from me.
On the final turn of the game, I brought both of my second set of flags back while my hovercraft and BattleArmor played rearguard. The enemy hovercraft harassed me but could not stop my Uziel from carrying the flag, and their Spider returned the last flag for their only point of the match. As with the previous battle, my losses far surpassed those I inflicted, but I scored four points and brought the match to an end.
This is the power of hovercraft and fast BattleMechs in Capture the Flag. Though my endurance and ability to survive weapons fire is greatly reduced when someone brings heavy firepower against me. It was a fast but deadly match, and my losses were heavy. I doubt I could have survived a push to take a fifth flag, but luckily I only needed four to win.

 Forge of War on Amazon
 Angel Flight on Amazon
 Angel Strike on Amazon
 Angel War on Amazon
 Wolfenheim Rising on Amazon
 Wolfenheim Emergent on Amazon
Discussion ¬